Chest Workout at Home: Build a Real Chest
You don’t need a bench, dumbbells, or a gym membership to build a chest. For most people in their first year of training, push-ups and a handful of variations will do almost everything a weight room would, and there’s research to back that up rather than just gym-bro confidence. A four-week trial found that progressive push-up training built bench-press strength comparable to training on the actual bench (Kotarsky et al., 2018).
No “you really should buy a bench” hedging here. What follows is a chest workout you can do at home with no equipment, scaled from a wobbly knee push-up all the way up to reps that get hard enough you’ll barely miss the weights.
The short answer
Push-ups, two or three times a week, with a rest day between sessions. That’s the core of a bodyweight chest workout, and it works because you can make a push-up harder more or less forever by changing the angle, the hand position, the tempo, and the range.
Start at a variation you can do for 8 to 12 clean reps. When that gets easy, move to a harder one. Aim for three to four sets per session, and stop each set a rep or two before total failure so your form doesn’t fall apart. The whole thing fits in a corner of your living room and takes about fifteen minutes.
The rest is just running that plan without sabotaging yourself.
What your chest actually is
A quick map helps, because “target your upper chest” is meaningless if you don’t know what’s up there.
The big muscle you think of as your chest is the pectoralis major. It’s a single fan-shaped muscle, but its fibers run in different directions and you can bias them with body angle:
- Upper (clavicular) fibers attach near your collarbone and pull your arm up and across. Decline push-ups, where your feet sit higher than your hands, load these hardest.
- Mid (sternal) fibers are the bulk of the chest, worked by a standard flat push-up.
- Lower (costal/abdominal) fibers sit toward the bottom of the breastbone. Incline push-ups, with your hands raised above your feet, lean on these.
Underneath sits the pectoralis minor, a smaller muscle that helps stabilize your shoulder blade. You won’t isolate it directly, and you don’t need to. Train the major across a few angles and the minor does its supporting job along the way.
So no single push-up hits the whole chest evenly. The angle of your body is the dial you turn instead of changing weights.
How to do a standard push-up
Most people’s push-ups are quietly broken, which is why their chest never grows. Get this right and half the article is done.
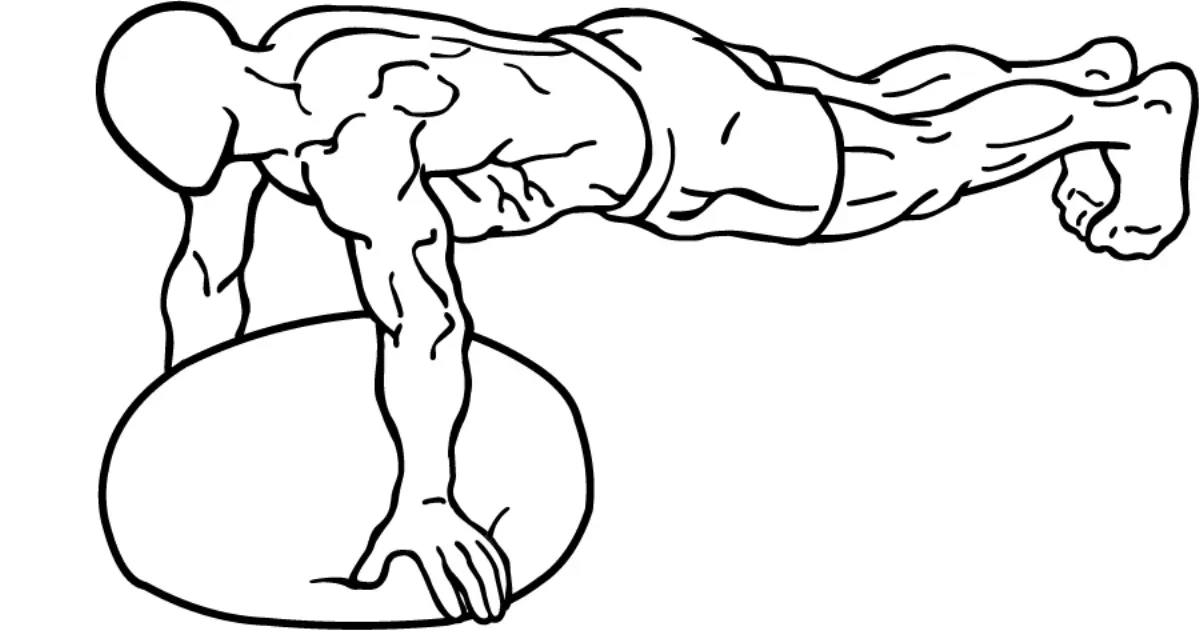 Illustration by Everkinetic via Wikimedia Commons (CC BY-SA 3.0)
- Set your hands slightly wider than shoulder-width, fingers spread, planted flat. Your hands should be roughly under your chest, not up by your face.
- Build a plank. Feet together (or hip-width for balance), legs straight, glutes and abs braced so your body is one rigid line from heels to head. No sagging belly, no piked hips.
- Tuck your elbows to roughly 45 degrees from your torso, not flared straight out to the sides. From above, your arms and body should make an arrow, not a T.
- Lower under control until your chest is an inch or two off the floor. Take about two seconds going down.
- Press back up by driving the floor away, keeping that rigid line the whole time. Squeeze your chest at the top.
If you can’t manage 5 clean reps like this, you’re not failing, you just need an easier starting point. Read on.
Push-up variations to progress without weights
This is where most people give up too early. A bodyweight chest workout never stalls as long as you keep raising the difficulty, and you raise it by swapping variations, not by grinding out 100-rep marathons. Here’s the ladder, roughly easiest to hardest.
Knee push-up (beginner)
Drop your knees to the floor and keep the same straight line from knees to head. This cuts the load you’re pressing by a good chunk while teaching the exact movement. Use it to build up to a single full push-up, then to a set of five. It’s a starting rung, not a place to live.
Incline push-up (on a surface)
Put your hands on a sturdy raised surface: a kitchen counter, a windowsill, the edge of a stable table. The higher the surface, the easier the push-up. It’s the smoothest way to bridge from knee push-ups to floor push-ups, and the angle happens to emphasize the lower chest fibers. Lower the surface over weeks (table, then chair, then floor) as you get stronger.
Decline push-up (feet elevated)
Now flip it. Put your feet up on a chair, couch, or bed and keep your hands on the floor. This shifts more bodyweight onto your arms and, because of the angle, drives the load into your upper chest, the area most home trainees neglect. Start with a low surface and raise it as it gets easier.
Close and diamond push-ups (inner chest and triceps)
Bring your hands close together under your sternum. In the diamond version your thumbs and index fingers touch to form a triangle. This narrow hand position fires up the chest and triceps noticeably more than a wide stance does. In an EMG comparison, push-ups from a narrow base produced greater muscle activation than the wide-base version (Cogley et al., 2005). They’re hard. Expect your rep count to drop, and that’s fine.
Wide-grip push-up
Hands well outside shoulder width. This biases the stretch toward the outer chest and reduces triceps involvement, so it’s a useful contrast to diamond push-ups even though the activation research favors the narrow position overall. Use it for variety and to feel the chest stretch, not as your only movement.
Slow-tempo push-up
Same standard push-up, but spend three or four seconds lowering and pause for a second at the bottom. Time under tension goes up, which means more work for the muscle without any new equipment. This is one of the cheapest ways to make a push-up you’ve outgrown hard again.
Deficit push-up (with books)
Put a stack of books, two yoga blocks, or anything stable under each hand and let your chest sink lower than your hands between them. The extra range stretches the chest further at the bottom and makes the press harder out of the hole. It’s an advanced move; introduce it only once your standard push-ups are clean and strong.
 Photo by PTPioneer via Wikimedia Commons (CC BY 2.0)
If you do own a pair of dumbbells, a floor press fills the same role as these harder variations and lets you add load in small steps. It’s a nice option, not a requirement. You can keep progressing for a long time with nothing but the floor and some furniture.
How to target upper vs lower chest
You already have the tools, so here’s the rule in one line: feet up for upper chest, hands up for lower chest.
Decline push-ups (feet elevated) tilt your body so the pressing direction is up-and-across, which is what the clavicular fibers do. Incline push-ups (hands elevated) do the opposite and favor the lower, sternal-to-abdominal fibers. A standard flat push-up sits in the middle and covers the bulk.
Don’t overthink the split. If you rotate through decline, flat, and a narrow variation across a week, you’ve hit upper, mid, and inner chest without a single piece of equipment.
A simple weekly plan
Train chest two or three days a week, never on back-to-back days. Muscle is built during recovery, so the rest is doing real work. The WHO’s physical activity guidance is clear that muscle-strengthening activity benefits everyone, and two to three focused sessions a week is plenty of stimulus (WHO, physical activity fact sheet).
Here’s a beginner-to-intermediate week you can run in a living room:
- Day 1 (mid chest focus): Standard or knee push-ups, 4 sets of 8 to 12. Wide-grip push-ups, 3 sets. Rest 60 to 90 seconds between sets.
- Day 2 (rest or other muscles): Walk, train legs, or work another area. See our ab workout at home and arm workout at home guides to build a full split.
- Day 3 (upper chest focus): Decline push-ups (feet elevated), 4 sets. Diamond push-ups, 3 sets to a couple of reps short of failure. Slow-tempo standard push-ups, 2 sets.
- Day 4 (rest).
- Day 5 (mixed): Pick the two variations that felt weakest this week and do 4 sets of each.
When any set starts feeling easy at the top of your rep range, move to the next-harder variation rather than just adding more reps. Your chest doesn’t grow because you did 40 push-ups, it grows because the push-ups were hard. If you’re pairing this with shoulder and glute work, our shoulder workout at home and booty workout at home routines slot into the rest days cleanly.
Common mistakes
A handful of errors quietly cancel out most home chest training. Fix these before you worry about anything fancy.
- Sagging hips or an arched back. If your belly drops or your lower back caves, you’ve turned a chest exercise into a spine exercise. Brace your glutes and abs so your body stays one straight line. This is the single most common fault.
- Half reps. Going down two inches and bouncing back up feels productive and builds almost nothing. The chest gets most of its work near the bottom of the range, so lower until your chest nearly touches the floor every rep.
- Flared elbows. Elbows winging out to 90 degrees turns the shoulders into the prime mover and is rough on the joint. Keep them tucked closer to 45 degrees.
- Rushing the reps. Speed lets momentum do the work your muscles should be doing. Lower under control, two seconds down, and you’ll feel the difference in your chest immediately.
- Never making it harder. Doing the same easy push-up for months is the reason people decide bodyweight “doesn’t work.” It works right up until it stops challenging you, and then you change the variation.
Keep showing up on the days you don’t feel like it
The form and the variations are the easy part. The hard part is doing this on a random Tuesday when no one is watching and nothing forces you to. Consistency, not a perfect program, is what separates the people who build a chest at home from the people who quit in week three.
That’s where it helps to have something keeping score. TrainWiz is a home-workout app, basically Duolingo for working out: a little companion that grows every time you work out at home, free with a premium tier, on iOS and Android. A finished push-up session feeds your streak and levels up your buddy, which turns “I should train” into a small reason to actually do it today.
None of that replaces the work. But on the days motivation is thin, a streak you don’t want to break is often enough to get you onto the floor for fifteen minutes, and fifteen minutes is the whole session. If the bigger problem is getting started at all, our guide on how to motivate yourself to work out and our piece on fitness gamification dig into why a small daily nudge beats waiting to feel inspired.
Pick a variation you can do today, do three or four sets, and put it on the calendar again for two days from now. The chest takes care of itself after that.
Frequently asked
- Can you build chest with just push-ups at home?
- Yes, especially in your first months of training. In a four-week study, progressive push-up training produced bench-press strength gains on par with actual bench pressing. Once standard push-ups stop feeling hard, you keep progress going by switching to harder variations like decline, deficit, or slow-tempo reps.
- How can I work my chest at home without any equipment?
- Push-ups and their variations are enough. Use knee or incline push-ups if standard ones are too hard, then progress to standard, decline (feet elevated), close/diamond, and deficit push-ups as you get stronger. Train chest two or three times a week with a day of rest in between.
- How do I target my upper and lower chest at home?
- Change the angle of your body. Decline push-ups, where your feet are elevated on a chair or bed, shift the load toward the upper chest, while incline push-ups with your hands raised emphasize the lower fibers. Mixing both angles across the week covers the whole muscle.