Knee Strengthening Exercises to Do at Home, No Equipment
The most effective way to protect an aging or vulnerable knee is to build up the muscles that surround it. When your legs are strong, the muscle tissue acts like a heavy-duty shock absorber. It takes the brunt of the impact every time your foot strikes the ground. Without that muscular support, the joint itself bears the entire load of walking, climbing stairs, and standing up from a chair. If you want to move comfortably through your day, dedicating time to leg strength is highly beneficial.
You don’t need heavy gym equipment or an expensive membership to start changing this dynamic. A simple floor routine done four to five days a week creates meaningful improvements in your joint stability. The fundamental rule for beginners is little and often. You start with just a few repetitions and respect your personal pain limits. Consistency always beats sudden bursts of intense effort.
We are going to look at a basic home sequence that builds the quadriceps, hamstrings, and hips. Getting these muscle groups working together provides a solid mechanical anchor for the kneecap. The program is designed to be gentle enough for a sensitive joint while providing enough resistance to stimulate real muscle growth over a period of weeks.
A 10-Minute Home Knee Routine to Start Today
Building a reliable habit requires a clear, uncomplicated plan. This basic routine requires only a floor mat and a sturdy chair for balance. It targets the primary leg muscles that keep the knee joint stable under load.
The routine at a glance (6 moves, no equipment)
Beginners should perform this sequence with very low repetitions to test how the joint responds. As you build strength and confidence, you will gradually increase the volume over several weeks.
| Exercise | Target Muscle | Beginner Start | Work up to |
|---|---|---|---|
| Quad Sets | Front of thigh | 2 to 3 reps | 2 sets of 15 reps |
| Straight Leg Raises | Front of thigh | 2 to 3 reps | 3 sets of 10 reps |
| Glute Bridge | Hips and buttocks | 2 to 3 reps | 2 sets of 15 reps |
| Clamshells | Outer hip | 2 to 3 reps | 2 sets of 15 reps |
| Standing Hamstring Curls | Back of thigh | 2 to 3 reps | 3 sets of 10 reps |
| Calf Raises | Lower leg | 2 to 3 reps | 2 sets of 15 reps |
Warm up first: 5-10 minutes of easy movement
Never jump straight into muscle strengthening from a completely rested state. Your tissues need preparation before they take on focused resistance work. The American Academy of Orthopaedic Surgeons (AAOS) recommends warming up with 5 to 10 minutes of low-impact activity before you begin strengthening exercises.
Walking around your house is usually sufficient. Using a stationary bicycle at a low resistance is also an excellent choice. This light aerobic activity increases blood flow to the muscles and helps the joint move more easily. After your short walk, you can move directly into the strengthening sequence without taking a long break.
How often: strengthening 4-5 days a week
How often you do this matters more than how hard you push in any single session. A typical conditioning prescription requires performing the main exercises like straight leg raises and hamstring curls 4 to 5 days a week. Calf raises are generally well-tolerated and can be done almost daily, up to 6 or 7 days a week.
You should plan to run this intensive building phase for 4 to 6 weeks. Once your muscles adapt and your daily pain decreases, you don’t have to work out quite so often. You can transition to a maintenance schedule. Maintaining the strength you have built usually requires only 2 to 3 sessions per week.
Why Strengthening Protects Your Knees
Stretching feels good and relieves immediate tension, but you also need structural support to handle the physical demands of gravity. The knee is a hinge joint that bears an enormous amount of weight. It requires sturdy surrounding architecture to function properly.
Muscles absorb shock the joint would otherwise take
Every time your heel strikes the pavement, a wave of force travels up your leg. If your leg muscles are underdeveloped, that force travels directly into the bones, ligaments, and cartilage of the knee. Over time, this repetitive mechanical stress leads to irritation.
The AAOS notes that strong muscles help the knee joint absorb shock. When your quadriceps and hamstrings are robust, they contract during movement to cushion the blow. They act just like the suspension system in a car. The stronger the suspension components are, the less turbulence reaches the fragile parts inside. Building up your thigh muscles gives the joint a permanent buffer against the stress of walking and running.
What the evidence shows for knee pain and osteoarthritis
Exercise is a heavily researched medical intervention for joint pain. A major 2015 review of 54 randomized controlled trials found high-quality evidence that land-based exercise reduces knee osteoarthritis pain.
On a scale of 0 to 100, exercise reduced knee pain by about 12 points and improved physical function by about 10 points. These benefits were sustained for 2 to 6 months after the treatment program ended. Furthermore, the researchers noted that the pain-relief effect of exercise is comparable to the estimates reported for non-steroidal anti-inflammatory drugs (NSAIDs). The pain relief is in the same range as NSAIDs, and you get stronger legs into the bargain.
This fits perfectly into broader health advice. The World Health Organization (WHO) 2020 guidelines recommend that adults complete 150 to 300 minutes of moderate aerobic activity weekly, alongside regular muscle-strengthening activity.
The muscle groups that support the knee
A comprehensive conditioning program addresses the entire leg. The knee may be a simple hinge, but it is controlled by a complex web of overlapping tissues. To build a highly stable joint, the AAOS program targets several distinct areas.
The program hits the quadriceps and hamstrings first, then the abductors, adductors, and glutes. Working all these areas creates a balanced leg. If you only strengthen the front of the thigh, you create an imbalance that can pull the kneecap out of its natural groove. A safe routine respects the anatomy by training the front, back, and sides of the lower body in equal measure.
Quad Exercises: The Foundation
The quadriceps are the large, powerful muscles on the front of your thigh. They are the primary shock absorbers for the knee and control the straightening of the leg. Underdeveloped quads are a very common cause of joint instability and fatigue.
Quad sets (static tightening): the true beginner start
If your knee is highly sensitive, large bending movements might cause a flare-up. Quad sets are the perfect starting point. They teach your nervous system to communicate with the muscle without requiring the knee joint to bend or bear any body weight.
Sit on the floor with your legs straight out in front of you. If sitting unsupported is uncomfortable for your lower back, lean flat against a wall. Focus on one leg at a time. Slowly tighten the muscle on the top of your thigh. Try to push the back of your knee flat down into the floor. Hold this firm muscular contraction for five seconds, then relax completely.
The goal is to feel a distinct tightening in the muscle belly. If you struggle to feel it, place your hand lightly on your thigh to monitor the muscle tensing up. Breathe naturally while you count to five. Rest for a few seconds between each repetition so the muscle can fully recover its oxygen supply.
Straight leg raises: form cues and common mistakes
Once you can perform quad sets comfortably for several days in a row, you can progress to straight leg raises. This exercise strengthens the quadriceps and hip flexors while keeping the knee locked in a safe, fully extended position.
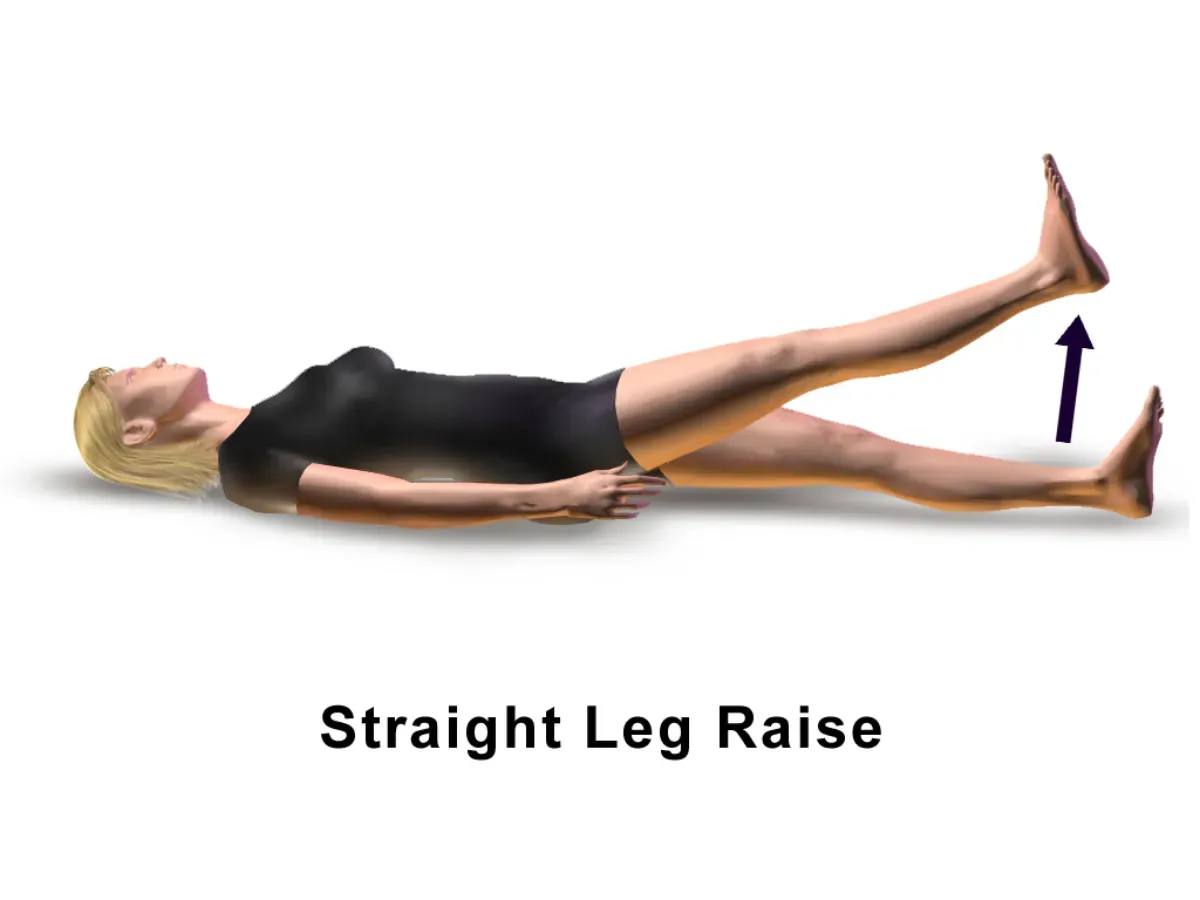 Illustration by BruceBlaus on Wikimedia Commons (CC BY-SA 4.0)
Lie flat on your back on a comfortable mat. Bend your non-working knee and place that foot flat on the floor. This bent-leg position protects your lower back and keeps your pelvis neutral. Keep your working leg completely straight on the floor. Tighten the quadriceps muscle on your straight leg, just like you did during the quad set. Slowly lift the straight leg off the floor.
Raise it until your heel is about one foot off the ground. Don’t lift it higher than the bent knee of your resting leg. Hold the raised position for a slow count of five. Lower the leg back to the floor with control. Relax the muscle entirely before starting the next repetition.
A common mistake here is rushing the movement. Swinging the leg up uses momentum instead of muscle power, which defeats the purpose of the exercise. Another frequent mistake is forgetting to tighten the thigh before lifting. Always lock the muscle first to protect the joint, then initiate the lift.
Half squats and wall sits: stop around 45 degrees
As you gain strength on the floor, it’s time to train your legs while standing. Half squats teach your leg muscles to work together under your own body weight, simulating the mechanics of getting out of a chair.
Stand with your feet shoulder-width apart. You can hold onto the back of a sturdy chair or a kitchen counter for balance. Slowly bend your knees and lower your hips backward. Keep your chest up and look straight ahead. Keep your weight primarily distributed in your heels rather than your toes.
Don’t drop down too deep. Stop when your knees are bent at roughly a 45-degree angle. Your thighs shouldn’t be anywhere near parallel to the floor during this beginner phase. Hold the bottom position for two seconds, then push firmly through your heels to stand back up.
If free-standing squats feel unstable, try a wall sit. Lean your back flat against a smooth wall. Walk your feet out about two feet and slide your back down the wall until your knees are slightly bent. Hold this static posture until your thighs feel fatigued, then carefully slide back up. If your leg muscles feel very tight after these exercises, you might eventually incorporate gentle quad stretches to maintain flexibility.
Glute and Hip Exercises: The Part Most People Skip
Many people with knee pain focus entirely on the knee itself. The knee joint sits directly between the hip and the ankle, meaning it is heavily influenced by what happens above and below it. If your hip muscles are weak, your thigh bone will rotate inward when you walk or climb stairs. This poor alignment forces the kneecap to track improperly against the bone.
Why hip strength matters for kneecap pain
Research confirms the importance of addressing the hips. A 2015 Cochrane review examined exercise for patellofemoral (kneecap) pain. The review found that exercise therapy may produce clinically important improvements, though the underlying evidence is very low quality.
Crucially, the research indicated that programs targeting both the hip and the knee tend to outperform programs that focus on the knee alone. You generally can’t fix a kneecap tracking issue without building a stable anchor at the hip joint.
Glute bridge: form cues
The glute bridge is a highly effective way to strengthen the buttocks and the lower back. These muscles propel you forward when you walk and keep your pelvis level when you stand on one leg.
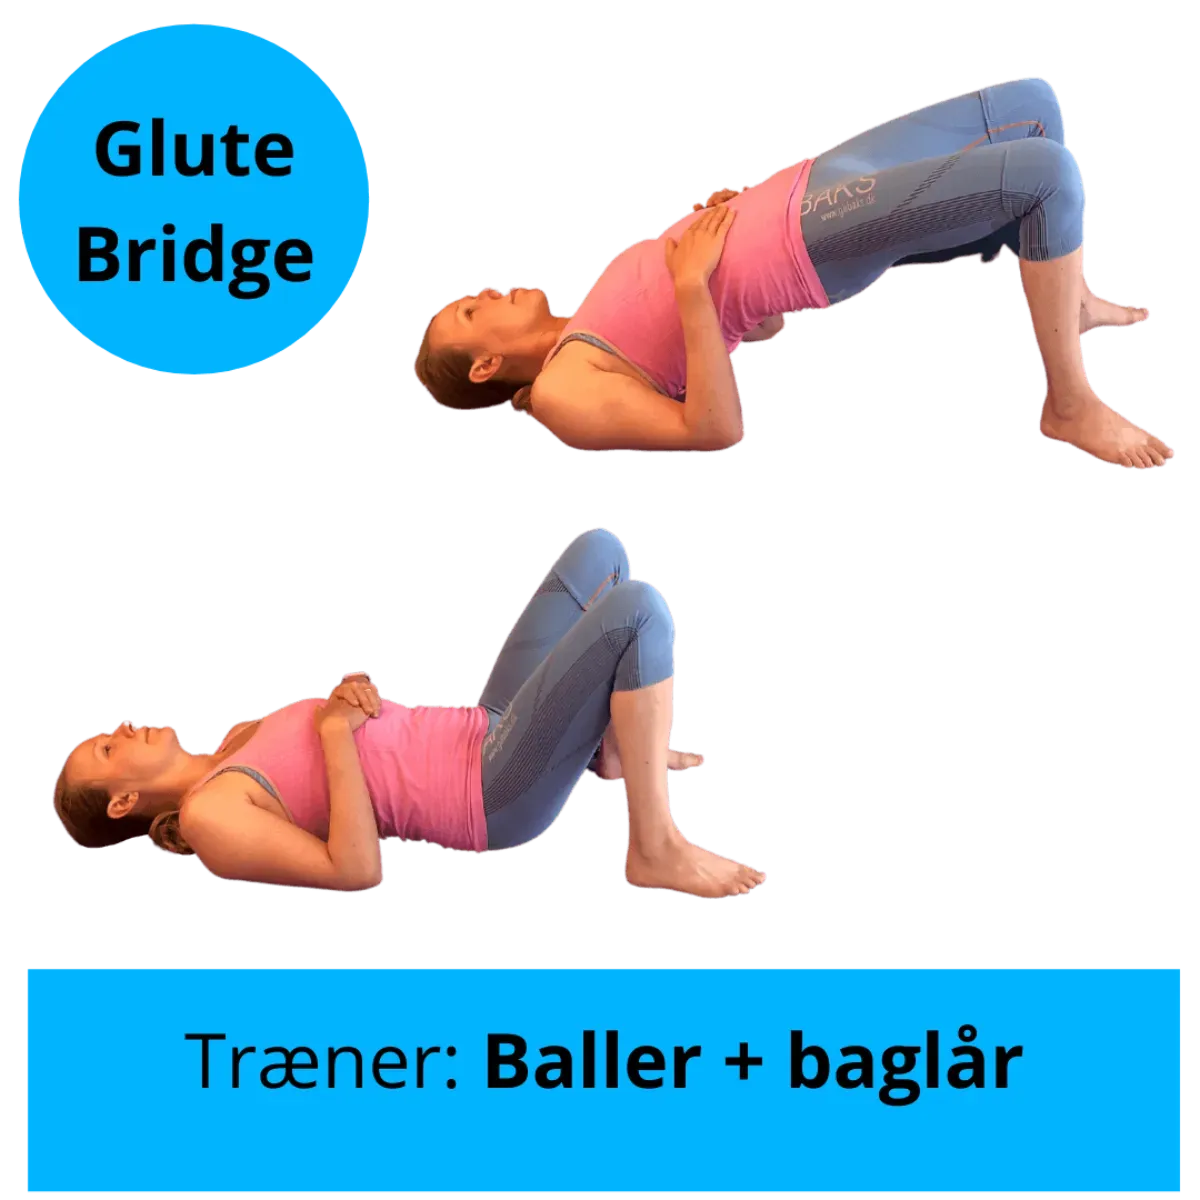 Photo by Marianne Gilbak on Wikimedia Commons (CC BY-SA 4.0)
Lie on your back with both knees bent and your feet flat on the floor. Place your feet hip-width apart. Position your heels close enough to your body that you can barely brush them with your fingertips. Keep your arms resting flat at your sides. Squeeze your gluteal muscles together. Push down through your heels and lift your hips off the floor.
Raise your hips until your body forms a straight line from your shoulders down to your knees. Avoid arching your lower back aggressively at the top. The power should come entirely from your buttocks. Hold the top position for a few seconds. Lower your hips slowly and smoothly back to the mat.
Side-lying leg raises and clamshells
To strengthen the outer hip (the abductors), you must move your leg away from the midline of your body against gravity.
For the side-lying leg raise, lie on your uninjured side. You can support your head on your bottom arm. Straighten your top leg and bend your bottom leg slightly for stability. Slowly lift your top leg straight up toward the ceiling. Keep your heel slightly behind your body line. Lifting the leg too far forward uses the hip flexors instead of the target muscles. Lower the leg slowly.
Clamshells target the deep rotators of the hip. Stay lying on your side, but bend both knees so your feet are stacked directly on top of each other. Keep your heels touching. Slowly lift your top knee open, resembling a clamshell opening on the beach. Your pelvis must remain perfectly still. Don’t roll your hips backward to get the knee higher. The movement should be small, isolated, and highly controlled.
If you also struggle with outer knee tension, this hip work pairs well with learning proper IT band stretches to keep the lateral thigh tissue healthy.
Hamstring and Calf Exercises
The back of the leg provides essential braking power. The hamstrings bend the knee and control your descent when walking downhill. The calf muscles control the ankle and push you off the ground. Both are necessary for a smooth, pain-free walking stride.
Standing hamstring curls: form cues
Standing hamstring curls isolate the back of the thigh without requiring any equipment. Stand facing a wall or the back of a sturdy chair. Hold on with both hands for balance. Shift your body weight onto your uninjured leg.
Slowly bend your working knee, lifting your heel up toward your buttocks. Keep your thighs parallel to each other. Don’t let the working thigh drift forward as you lift the heel. Keep your posture tall and avoid hinging forward at the waist. Hold the heel in the top position for a few seconds. Lower the foot slowly to the floor.
You should feel the muscle on the back of your thigh contracting firmly. A common mistake is flexing the foot too hard, which can cause severe cramping in the calf. Keep your ankle totally relaxed while you lift.
Calf raises: the one you can do almost daily
Your calf muscles absorb a massive amount of force every time you take a step. According to the AAOS program, you can safely perform calf raises 6 to 7 days a week because these muscles are built for high endurance.
Stand near a wall for balance. Place your feet shoulder-width apart. Slowly push up onto the balls of both feet, raising your heels as high as they will comfortably go. Push through your big toes to prevent your ankles from rolling outward. Keep your legs straight but don’t lock the knee joints aggressively backward. Hold the top position for two seconds. Lower your heels slowly back to the floor.
Start with a few repetitions and build up to two sets of fifteen. Over time, these will become very easy. When you have built up endurance, you can explore targeted calf stretches to ensure the muscle remains pliable after frequent strengthening.
Balance carryover: single-leg stands
Strengthening the lower leg naturally improves your balance. You can test this by incorporating simple single-leg stands into your daily routine. Stand near a counter. Lift one foot slightly off the floor. Try to hold your balance for 10 to 20 seconds.
You will feel the muscles in your foot, calf, and hip making tiny, rapid adjustments to keep you upright. This subconscious muscle control is exactly what your knee needs when you walk over uneven ground or navigate a dark room. If you are building a broader routine, these balance elements fit perfectly into a comprehensive leg workout at home.
How to Progress Without Flaring Your Knee Up
Building muscle takes weeks of consistent effort. The biggest mistake beginners make is rushing the process. Pushing too hard in the first week usually results in a painful flare-up that forces you to abandon the routine entirely.
Start low: from a few reps to 2 sets of 15
The NHS inform guidelines for knee problems offer a clear, conservative progression path. You must start low. When trying a new exercise for the first time, begin with just 2 or 3 repetitions.
This feels like very little work. That is intentional. You are testing how your knee responds to the new mechanical load. If your knee feels fine the next day, try 4 or 5 repetitions during your next session. Gradually build up to sets of 8. Your ultimate cap for a beginner endurance phase is 2 sets of 15 repetitions. Remember the golden rule of rehabilitation. Little and often is far superior to a massive, exhausting session once a week.
The 0-5 pain rule: soreness is OK, pain is information
Pain management is often the most confusing part of joint rehabilitation. You need to distinguish between safe muscle fatigue and dangerous joint pain to progress safely.
The AAOS states clearly that you should not feel pain during an exercise. If a movement causes stabbing pain inside the joint, stop immediately. The NHS 0-5 scale above is where mild discomfort has its place; pain is a different signal.
The NHS uses a helpful 0 to 5 pain rule. Imagine a scale from 0 to 10. Zero means no pain at all. Ten is the worst pain imaginable. During your exercises, your pain should stay between 0 and 5. This level of mild to moderate discomfort is acceptable. If your pain pushes past a 5, you are working too hard. You need to reduce your repetitions, slow down your speed, or rest longer between sets.
Muscle soreness is different from joint pain. Feeling achy, tired muscles the day after a new exercise is completely fine. This delayed soreness is a sign that the muscle is adapting and growing stronger. It should settle quickly over a day or two. If your joint symptoms worsen and stay worse, you need to scale back your routine.
When to add difficulty (reps first, then range, then load)
Progress your exercises systematically. Don’t add weight immediately. First, increase your repetitions until you can comfortably complete the target sets with good form.
Once the repetitions feel easy, you can increase your range of motion. Squat slightly lower, or lift your leg slightly higher, provided the movement remains pain-free. Only after you have mastered the repetitions and the range of motion should you consider adding physical load, such as light ankle weights or resistance bands. If you want to understand more about structuring your routines safely, reviewing a general beginner stretching guide can help you balance your strength and mobility work.
What to Avoid, and When to See a Doctor
Exercise is safe for most chronic knee conditions, but certain activities will aggravate an irritable joint. You must also know when home exercise is no longer appropriate and medical intervention is required.
Moves to skip while your knee is irritable
While your knee is painful, avoid exercises that place extreme shear force on the joint. Deep squats where your hips drop below your knees should be avoided until you have built significant foundational strength and have cleared it with a physical therapist.
Skip jumping and hopping for now, and hold off on running while the knee is irritable. These high-impact activities place massive shock loads on the joint that weak muscles cannot yet absorb. Stick to smooth, controlled, land-based exercises where at least one foot remains on the floor at all times.
Red flags: locking, giving way, major swelling, injury
Some symptoms indicate a mechanical problem or a severe acute injury that floor exercises cannot fix. The NHS guidelines on knee pain provide a clear list of medical red flags that require attention.
You must stop exercising and get urgent medical help if your knee locks or catches painfully in one position. You should also seek immediate care if your knee suddenly gives way beneath you. If the joint becomes badly swollen, changes its normal shape, or cannot bear your body weight at all, you need a doctor. Finally, if your knee pain comes with a high temperature, or if the pain is the direct result of a sudden, traumatic injury like a heavy fall, don’t attempt to exercise it away. Seek professional evaluation immediately.
If it hasn’t improved in a few weeks
Rehabilitation requires patience. Tissues take weeks to remodel and strengthen. However, you shouldn’t persist with a failing home program forever.
The NHS advises that you should see a General Practitioner if your knee pain doesn’t improve within a few weeks of resting and trying home management. Specifically, if you have been performing a gentle exercise routine and see absolutely no improvement within 6 weeks, it’s time to seek professional advice. A physiotherapist or doctor can assess your specific body mechanics and provide a tailored intervention that addresses your exact diagnosis.
Frequently asked
- Can I exercise if my knees already hurt?
- Yes, but you must start very slowly. Keep any discomfort between 0 and 5 on a 10-point scale during the movement. If the pain rises higher, reduce your repetitions or rest longer between sets.
- How long does it take to see results from knee exercises?
- A standard conditioning program runs for 4 to 6 weeks. You should notice improvements in stability and pain reduction within this timeframe. If you see no improvement after six weeks, it is time to consult a healthcare professional.
- Is walking enough to strengthen my knees?
- Walking is great for general health, but it doesn't load the thigh muscles enough to build much strength. You need targeted resistance exercises for your quadriceps, hamstrings, and glutes to provide true shock absorption for the knee joint.