Shoulder Mobility Exercises: A 10-Minute Daily Routine

Fixing stiff shoulders requires a blend of active stretching and targeted muscle control. A dedicated shoulder conditioning program usually runs for four to six weeks. Doing stretches alone rarely produces lasting results because you must teach your rotator cuff and upper back to actively control the new ranges of motion you open up. The standard approach splits this work into two distinct phases. A brief ten-minute daily mobility block focuses on opening the joint. A secondary strength block, performed three days a week, builds the muscular endurance needed to maintain that new range.
Most desk workers assume their shoulders are permanently frozen into a forward slouch. The reality is much more forgiving. The stiffness you feel at the end of a long workday is largely a temporary mechanical block. By testing your baseline reach and committing to a structured conditioning window, you can restore a surprising amount of functional overhead range. The process doesn’t require heavy weights or hours in the gym. You just need a flat wall, a light resistance band, and a commitment to daily movement.
Why Shoulders Feel Stiff Overhead
Stiffness often feels like a tight muscle pulling against your movement. The reality of shoulder mechanics is more complex. The sensation of stiffness usually comes from a combination of joint position, muscle weakness, and a lack of regular movement through your full range.
Mobility vs. flexibility: range you can actually control
Flexibility refers to how far your muscles can passively stretch. Mobility describes how far you can actively move a joint using your own muscle strength.
You might have the flexibility to let a physical therapist lift your arm perfectly straight overhead. If you can’t lift that same arm overhead by yourself, you lack mobility. You lack the motor control and strength at the end of the joint’s range.
This distinction dictates how we fix the problem. Passive stretching only addresses half the equation. The OrthoInfo-AAOS conditioning program deliberately pairs stretching with rotator cuff and scapular strengthening to build stability at the edges of your reach.
The shoulder is a team: shoulder blade, upper back, rotator cuff
The shoulder is a complex network of moving parts. Your upper arm bone sits in a shallow socket on your shoulder blade. Your shoulder blade glides over your ribcage. Your upper back must extend backward to allow your arms to reach high.
The rotator cuff is a group of four small muscles that stabilize the ball in the socket while the larger muscles move the arm. The ball-and-socket joint of the shoulder is incredibly shallow. Think of a golf ball resting on a small tee. This design allows for massive freedom of movement, letting you reach across your body or straight up to the ceiling. It relies almost entirely on soft tissue and muscle for its stability.
If any member of this anatomical team stops doing its job, the main shoulder joint takes the strain. A stiff upper back blocks the shoulder blade from tilting upward. A weak rotator cuff fails to keep the ball centered in the socket during movement.
What slouching alone does to overhead reach
Your immediate physical position heavily influences how well your shoulder joint functions. Sitting in a heavily rounded position changes the angle of your shoulder blade. This creates a mechanical block when you try to lift your arm.
Research by Kebaetse-1999 demonstrated exactly how much range you lose when you slouch. In a single-session lab measurement, slouched sitting cut active shoulder abduction by a mean of 23.6 degrees. Reaching out to the side becomes physically restricted by the position of your spine.
The same study found that slouched sitting reduced elevation muscle force by 16.2 percent at the horizontal position. Slouching makes your shoulder muscles measurably weaker while you sit that way. The stiffness you feel at your desk might just be your sitting position mechanically blocking the joint.
Test Yourself: Three 30-Second Shoulder Mobility Checks
Before starting a new routine, you need to know your current baseline. These simple checks reveal whether your limitations are in rotation, overhead extension, or simple muscular control. Perform these movements slowly and honestly.
Reach behind your back (Apley scratch test)
This classic assessment checks your internal and external rotation simultaneously. Stand up straight in a relaxed posture. Reach your right arm up, bend your elbow, and drop your hand behind your neck. Reach your left arm down, bend your elbow, and slide the back of your hand up your spine.
Try to bring your fingers together. Measure the gap between your hands. You don’t need to force the stretch. Switch arms and repeat the movement. Pay attention to how different the two sides feel. Most people have one arm that behaves very differently from the other, giving you a clear baseline to measure your progress against.
Back-to-wall overhead reach (wall angel test)
This movement tests your active overhead mobility while preventing your spine from cheating. Stand with your back flat against a wall. Your heels, buttocks, upper back, and the back of your head must maintain contact with the wall surface.
Raise your arms out to the sides. Bend your elbows to ninety degrees. Press the backs of your forearms and hands against the wall. Slowly slide your arms upward toward the ceiling.
Notice when your lower back tries to arch away from the wall. Notice when your elbows or hands peel off the surface. The point where you lose contact is your true limit for active overhead mobility. Keep your core tight to prevent your ribs from flaring upward.
Forward flexion test
This final check looks at your ability to raise your arms directly in front of you. Stand perfectly straight with your arms resting at your sides. Keep your elbows locked straight and your thumbs pointing up toward the ceiling. Slowly raise both arms straight forward and up as high as they will go.
Ideally, your biceps should line up with your ears without you having to arch your lower back or crane your neck forward. If your arms stop out in front of your face, or if you feel a hard pinching block at the top of the joint, your overhead flexion is limited.
Interpret your results carefully. Symmetrical stiffness across both shoulders generally responds well to a basic daily routine. Your joints simply need more frequent exposure to end-range movements. Asymmetry is common, so you can spend a little extra time stretching the tighter side while continuing to train both shoulders evenly.
Pain requires a strict boundary. The OrthoInfo-AAOS guidelines state clearly that you shouldn’t feel pain during an exercise. If you feel a sharp pinch during a repetition, stop and adjust your position.
The 10-Minute Daily Shoulder Mobility Routine
A high-frequency, low-duration approach works best for joint mobility. We separate this conditioning work into a brief daily mobility block and a slightly longer strength block performed three days a week.
Warm up first: 2 minutes of easy movement
Cold muscles and joints resist stretching. The OrthoInfo-AAOS protocol recommends warming up with 5 to 10 minutes of low-impact activity before starting shoulder mobility or strength work. AAOS suggests 5 to 10 minutes; for this short routine, 2 minutes of brisk movement is the floor.
Walk briskly, hop on a stationary bike, or just swing your arms for a minute. Any amount of physical activity is better than none. According to the WHO, even a ten-minute daily routine counts as legitimate, health-promoting physical activity.
The routine at a glance (order, reps, time)
This routine combines the specific stretches and control exercises outlined in the medical conditioning guidelines.
| Exercise Type | Movement | Sets & Reps | Frequency |
|---|---|---|---|
| Mobility | Crossover Arm Stretch | 4 reps per side | 5-6 days/week |
| Mobility | Passive Internal Rotation | 4 reps per side | 5-6 days/week |
| Mobility | Passive External Rotation | 4 reps per side | 5-6 days/week |
| Mobility | Sleeper Stretch | 4 reps per side | Up to 3x daily |
| Control | Scapular Retraction | 2 sets of 10 | 3 days/week |
| Strength | Standing Row | 3 sets of 8 | 3 days/week |
| Strength | Internal Rotation | 3 sets of 8 | 3 days/week |
| Strength | External Rotation | 3 sets of 8 | 3 days/week |
| Strength | Bent-Over Abduction | 3 sets of 8 | 3 days/week |
How often, and how long until you notice a difference
Tissue adaptation requires persistent signaling. The OrthoInfo-AAOS shoulder conditioning program runs for four to six weeks. You perform the mobility stretches five to six days a week. You perform the control and strength exercises three days a week. The strength block naturally takes a little longer to complete due to the required rest periods between sets.
You’ll likely feel looser after your very first session. Lasting structural changes take weeks of repetition.
The NHS advises patients to keep exercises going for 6 to 8 weeks to stop symptoms from returning. Self-care usually takes about 2 weeks before pain starts to ease. Full recovery from a stubborn shoulder issue can take 6 months or longer. Set your expectations accordingly and focus on completing the daily repetitions.
The Exercises, Organized by What They Fix
We group these movements by their functional purpose. Execute them with slow, deliberate pacing. Rushing through the repetitions ruins the intended mechanical benefit. Focus on feeling the correct muscles working rather than just moving your arm from point A to point B.
Overhead reach: wall slides and thoracic extension
Improving your overhead reach requires opening the front of the shoulder and mobilizing the upper spine.
Start with the crossover arm stretch from the AAOS program. Relax your shoulders. Pull one arm across your chest just below your chin. Pull gently on the upper arm with your opposite hand. Hold the stretch for thirty seconds. You should feel a stretch in the back of your shoulder. Perform four repetitions per side. Keep your shoulders pulled down away from your ears. If you shrug your shoulder up during the stretch, you lose the leverage on the target tissues.
Next, perform wall slides. Return to the wall angel test position with your back flat against the wall and your arms bent to ninety degrees. Slowly slide your arms up the wall as far as you can without letting your lower back arch. Pause at the top for a brief second, then pull your arms slowly back down to the starting position. Complete two sets of ten slow repetitions. This teaches your body to actively control the overhead range.
Finally, work on thoracic extension. The cat-cow movement gently articulates the vertebrae in your upper back.
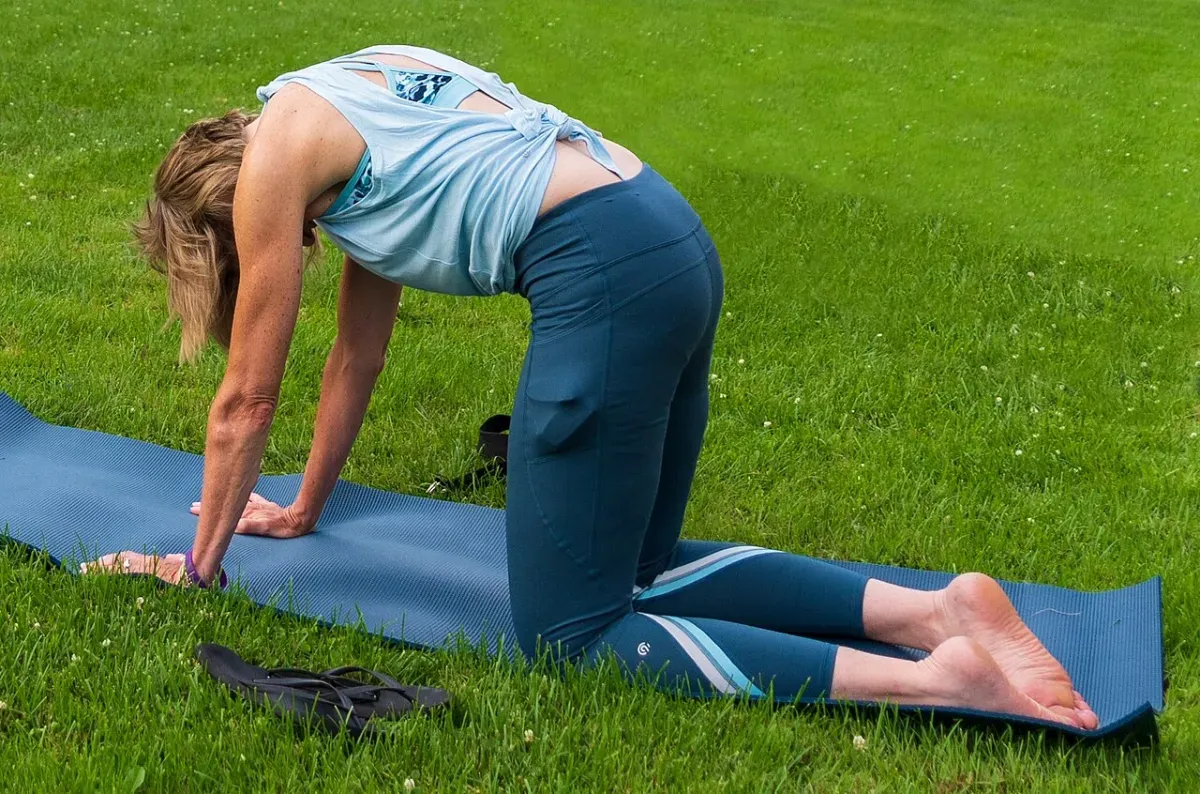 Photo by Mary O’Neill on Wikimedia Commons (Public domain)
Kneel on all fours with your hands directly under your shoulders and your knees under your hips. Drop your belly toward the floor and lift your chest, creating a gentle arch in your back. Reverse the motion by pressing the floor away and rounding your upper back toward the ceiling. Move slowly between these two extremes. If you want more targeted spinal work, you can explore specific upper back stretches.
Rotation control: shoulder circles and external rotation with a band
Rotation is the most vulnerable motion for the shoulder joint. We build rotation control through dynamic movement, passive stretching, and active resistance.
Begin with basic shoulder circles to lubricate the joint. Stand tall and let your arms hang loosely at your sides. Slowly roll both shoulders forward, up toward your ears, backward, and down in a smooth, continuous circular motion. Complete ten slow circles in one direction, then reverse the motion for ten more circles.
For passive internal and external rotation, use a light stick or a broom handle. Hold the stick behind your back with one hand grasping the bottom and the other grasping the top. Gently push the stick upward to stretch the lower arm into internal rotation. Hold for thirty seconds.
The sleeper stretch provides excellent passive internal rotation. Lie on your side on a firm surface. Your bottom shoulder should be tucked slightly under you. Bend your bottom arm to ninety degrees so your hand points toward the ceiling. Use your top hand to gently push the bottom forearm down toward the floor. Stop when you feel a stretch in the back of the shoulder. Hold for thirty seconds. The AAOS protocol allows for four repetitions up to three times daily.
Follow the stretches with active rotation strength. Anchor a light resistance band to a door handle. Stand sideways to the door. Keep your elbow tucked firmly against your ribs. Pull the band outward away from your body for external rotation. Turn around and pull the band inward across your stomach for internal rotation. Complete three sets of eight repetitions.
Scapular control: retraction, rows, and bent-over horizontal abduction
The shoulder blade must provide a stable platform for the arm. If the blade can’t stabilize, the rotator cuff has to work overtime.
Begin with scapular retraction. Stand tall with your arms at your sides. Shrug your shoulders slightly backward. Squeeze your shoulder blades together as if you are trying to hold a pencil between them. Hold the squeeze for five seconds. Release slowly. Complete two sets of ten repetitions. If your neck feels tight during this movement, review our guide to trap stretches to help relax the upper fibers.
Move on to the standing row. Anchor your resistance band at chest height. Hold both ends. Step back until the band has slight tension. Squeeze your shoulder blades together and pull your elbows back. Keep your forearms parallel to the floor. Don’t let your shoulders hike upward. Complete three sets of eight repetitions. Pause at the back of the movement to ensure the upper back muscles are doing the work.
Finish with bent-over horizontal abduction. Bend forward at the waist while keeping your back perfectly flat. Let your arms hang straight down. Slowly raise your arms out to the sides until they are parallel to the floor. Squeeze your shoulder blades at the top of the movement. Lower your arms slowly. Complete three sets of eight repetitions. Keep your neck in a neutral position by looking at the floor slightly ahead of your feet.
The Desk Posture Connection: What the Evidence Actually Says
Desk workers frequently complain of stiff shoulders. Office culture often blames this stiffness on poor posture. The scientific literature paints a more nuanced picture of how sitting affects your joints.
Posture doesn’t predict pain, but position changes your range
You have likely been told that slouching causes shoulder pain. The data doesn’t strongly support this claim. A comprehensive review by Barrett-2016 found moderate evidence of no difference in thoracic kyphosis between people with and without shoulder pain. People with perfectly straight upper backs get shoulder pain, and people with heavily rounded backs often live completely pain-free.
Do not blame bad posture for your pain. View it purely as a mechanical limitation on your range of motion.
There is strong evidence that maximum shoulder range of motion is greater in erect postures than in slouched postures. This holds true for people with and without shoulder pain. Sitting up straight immediately improves the physical clearance in your shoulder joint. Your arm can travel further before the bones bump into the surrounding tissues.
Micro-breaks that keep overhead range topped up
The Barrett study includes an important caveat. The range of motion gains observed in erect postures come from single-session studies. The long-term effects of posture change on shoulder mechanics remain unproven.
You don’t need to hold a rigid, upright posture for eight hours a day. Holding a rigid posture creates its own muscular fatigue. The better strategy involves frequent movement.
Stand up from your desk every hour. Reach your arms overhead. Roll your shoulders backward. These micro-breaks restore your mechanical advantage and prevent the tissues from stiffening into one set position. If you sit for long hours, integrating our beginner stretching guide into your daily breaks can make a massive difference in how your joints feel by the end of the day.
How to Progress Without Flaring Anything Up
The fastest way to derail a mobility program is to push too hard, too early. The shoulder joint is sensitive to sudden spikes in workload. Progress must be methodical.
Weeks 1-2: own the range (bodyweight, slow reps)
Spend your first two weeks focusing entirely on form and control. Use only your body weight and very light resistance bands.
Pay attention to your breathing. Holding your breath increases internal tension and fights the stretching process. Exhale slowly as you move into the deepest part of a stretch. Let your muscles relax into the new position.
Adhere strictly to the pain rule. Pain during a rep means stop and adjust. A deep stretching sensation in the muscle belly or mild fatigue in the back of the shoulder is fine. A sharp, pinching pain at the top of the shoulder joint is unacceptable. If a specific movement pinches, reduce the range of motion until the pain disappears. You can also explore gentle shoulder stretches you can do at a desk to ease into the deeper work.
Weeks 3-6: add light load and hold end ranges
Once you can perform the bodyweight movements comfortably, you can introduce light external loads.
 Photo by PTPioneer on Wikimedia Commons (CC BY 2.0)
Add a small dumbbell to your bent-over horizontal abductions. Step further away from the door to increase the tension on your resistance band during rows and rotations.
Continue holding your passive stretches for thirty seconds. Ensure you are also opening up the front of the body with chest stretches that open the front of the shoulder to balance the strengthening work you are doing on the back.
After that: maintenance 2-3 days a week
You don’t have to do the full routine every single day forever. Once you achieve a comfortable, functional range of motion, you enter the maintenance phase.
The AAOS protocol advises dropping the frequency to two to three days a week. This provides enough stimulus to maintain the strength and mobility you’ve built. You can easily blend these maintenance exercises into your regular gym warm-up or perform them on your rest days.
When Stiffness Is a Signal to Get Checked
Not all shoulder stiffness responds to a home exercise routine. Sometimes, a stiff joint is a symptom of an underlying pathology that requires professional medical management. Knowing the difference saves you months of frustration.
Stiffness vs. pain: two different plans
General stiffness usually feels like a dull ache or a physical restriction at the end of a movement. It tends to warm up and feel better after a few minutes of light activity.
The NHS guidelines recommend that you stay active and gently move the shoulder when dealing with general aches. Avoiding movement entirely usually makes the joint stiffer. Commit to a gentle routine and monitor your symptoms. Self-care usually takes about two weeks before the pain starts to ease.
Red flags that skip the routine and go to a professional
Certain symptoms demand immediate professional attention. You should see a medical professional if your shoulder pain worsens or hasn’t improved after two weeks of dedicated self-care.
See a professional immediately if moving the arm is very difficult. If you have night pain that wakes you from sleep, new weakness after a fall or injury, a shoulder that has changed shape or is badly swollen, or pain with stiffness that keeps worsening, skip the routine and see a clinician. A progressive loss of motion combined with severe pain is a hallmark of adhesive capsulitis, commonly known as frozen shoulder. This condition requires a very different, carefully managed medical approach.
Frequently asked
- How long does it take to improve shoulder mobility?
- A dedicated shoulder conditioning program usually runs for four to six weeks. You might notice small changes in your range of motion sooner, but lasting adaptation takes time. Continue the routine for six to eight weeks to prevent your symptoms from returning.
- Should shoulder mobility exercises cause pain?
- You shouldn't feel pain during an exercise. If you feel a sharp pinch or pain during a repetition, stop and adjust your position immediately. A gentle stretch or mild muscle fatigue is perfectly fine, but sharp pain is a clear signal to stop.
- Does bad posture cause shoulder pain?
- Current evidence shows no difference in upper back posture between people with and without shoulder pain. Slouched sitting does temporarily reduce how far you can reach overhead. Changing your posture can improve your immediate range of motion, even if posture itself isn't the root cause of your pain.